buildclass: a Purely Declarative Approach to Build Classes

Image generated by DALL·E from a prompt by the author
DynDesign recently introduced a release featuring buildclass, a new
function enabling the Python developers to build a new class from a base
class through a purely declarative approach.
This article presents a direct comparison between buildclass and a
more conventional approach: the Builder Design Pattern.
Motivation
Consider this scenario: a hierarchy of classes connected to each other through inheritance or composition, where the connections between the classes are configured based on dynamic options. The goal is to produce code that is efficient, readable, maintainable, and aligns closely with SOLID principles, particularly the Single Responsibility Principle (SRP) and the Open Closed Principle (OCP).
The buildclass function provides developers with a streamlined
approach to attain this goal, by replacing manual code implementation of
the configuration with a standardized solution that uses a set of
simple declarations.
Testing Ground: Building a Car
Our testing environment will consist of Python scripts simulating the construction of a car. The scripts will take the following arguments into account: - Certain car properties that need to be assigned to the car, such as the Model; - Mandatory component specifications, which will be assigned by default if not provided, such as the Engine type; and - Optional component specifications, which may or may not be added, such as a Sunroof.
The complete code for all the scripts discussed in this article can be found at this GitHub repository.

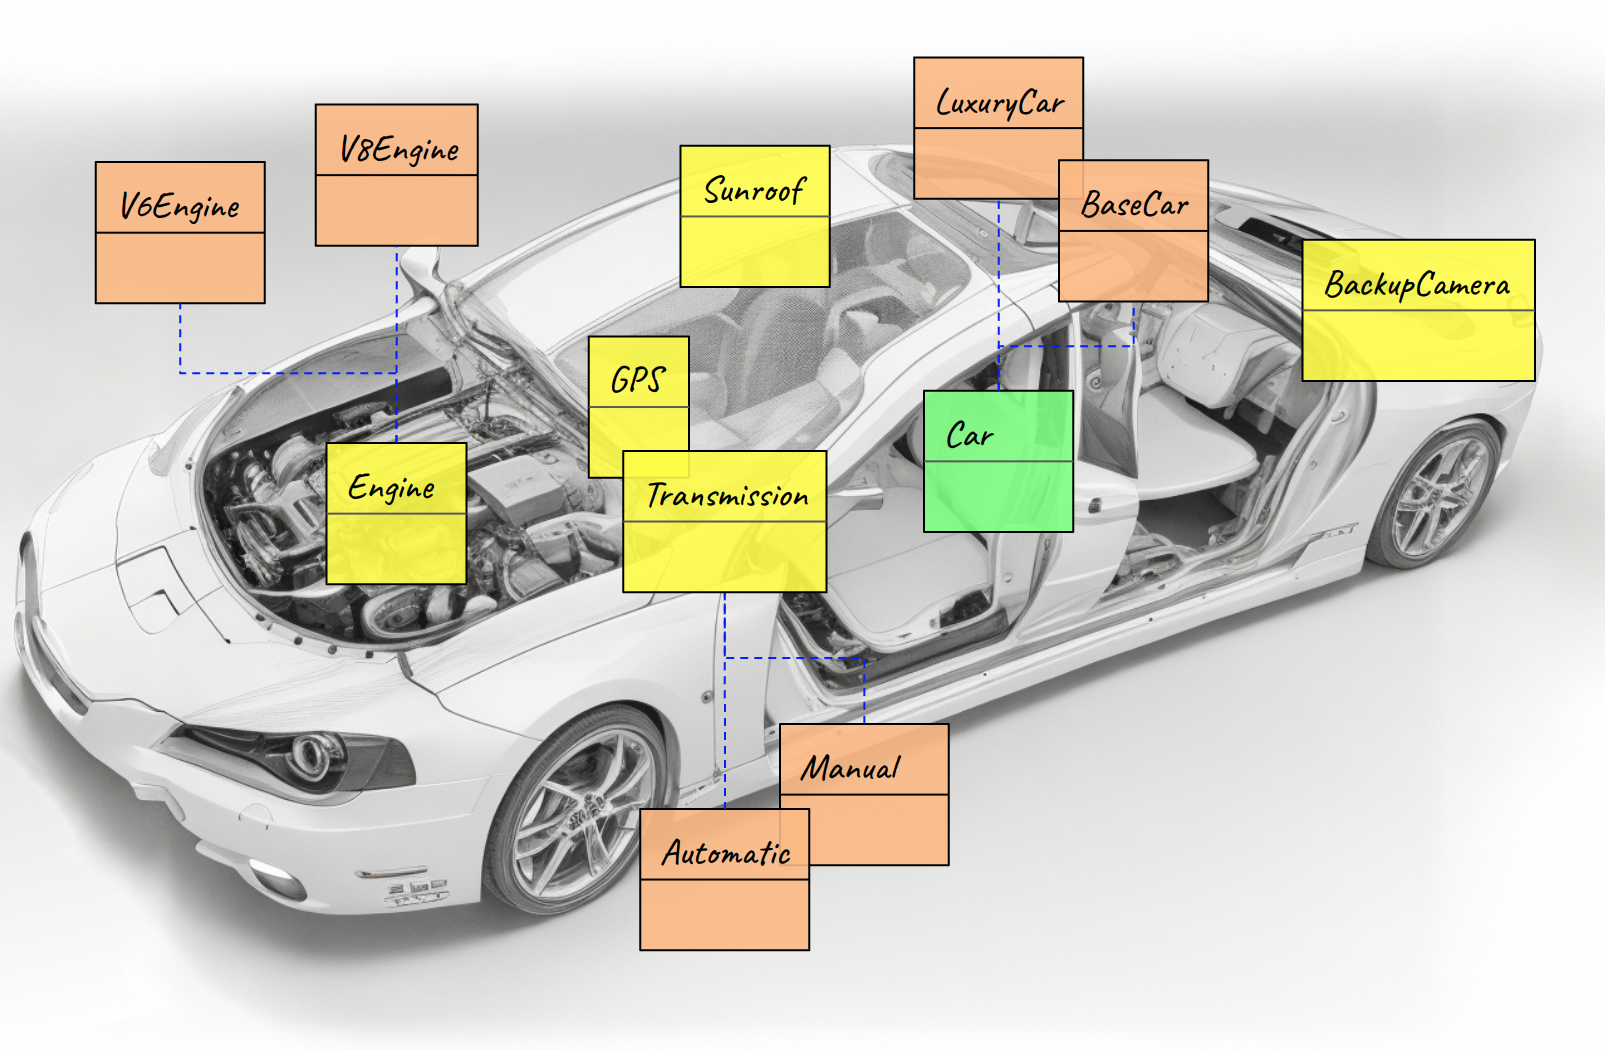
In the above image, the components are highlighted in yellow, while the alternative choices are highlighted in orange.
Two approaches will be compared in the scripts: one employing the Builder Design Pattern (implemented in the “car_builder.py” scripts) and the other utilizing ``**buildclass**`` (implemented in the “car_dynconfig.py” scripts).
Base Car with a Builder Pattern
Below is an example of how the construction of a base car can be implemented using a simplified Builder Design Pattern.
# car_builder.py

# Base component classes
class Engine:
    def __init__(self, engine_type):
        self.engine_type = engine_type or "V6"

    def echo(self):
        print(f"\tEngine: {self.engine_type}")


class Transmission:
    def __init__(self, transmission_type):
        self.transmission_type = transmission_type or "Manual"

   ...
...


# Class to manage car components
class Components:
    def __init__(self):
        self.components = []

    def add(self, component):
        self.components.append(component)

    def echo(self):
        if self.components:
            print(" with components:")
            for component in self.components:
                component.echo()


# Base car class
class Car:
    def __init__(self, make, model):
        self.make = make
        self.model = model
        self.components = Components()

    def echo(self):
        print(f"Building {self.make} {self.model}", end='')
        self.components.echo()
        print()


# Class Builder class to assemble a car based on the options
class CarBuilder:
    def __init__(self, args):
        self.car = Car(args.make, args.model)
        self.args = args

    def build(self):
        self.car.components.add(Engine(self.args.Engine))
        self.car.components.add(Transmission(self.args.Transmission))

        if self.args.GPS:
            self.car.components.add(GPSNavigation())
        ...
        return self.car


if __name__ == "__main__":
    parser = argparse.ArgumentParser()
    parser.add_argument('-make')
    parser.add_argument('-model')
    parser.add_argument('-Engine')
    ...
    args = parser.parse_args()

    # Create a car
    car_builder = CarBuilder(args)
    car = car_builder.build()

    car.echo()
The script above essentially parses the script arguments and forwards them to a CarBuilder instance. This CarBuilder instance is responsible for creating an instance of the Car class and incorporating the required and optional components.
Below is an example of script usage.
$ python car_builder.py -make=Toyota -model=Camry  -Engine=V8  -GPS
Building Toyota Camry with components:
   Engine: V8
   Transmission: Manual
   GPS Navigation
Base Car with buildclass
Instead of writing our own CarBuilder class, we can use the DynDesign’s
buildclass function. The Car class is decorated with the
@dynconfig decorator, passing in the CarConfigurator class as an
argument. The CarConfigurator class contains all of the possible
required and optional car properties. Then, the Car class and the script
arguments is passed to buildclass .
# car_dynconfig.py

from dyndesign import buildclass, dynconfig, ClassConfig, LocalClassConfig
import argparse

...

# DynConfig Configurator class
class CarConfigurator:
    Engine = ClassConfig(component_class=Engine, force_add=True)
    Transmission = ClassConfig(component_class=Transmission, force_add=True)
    GPS = ClassConfig(component_class=GPSNavigation)
    Camera = ClassConfig(component_class=Camera)
    Sunroof = ClassConfig(component_class=Sunroof)

    DYNDESIGN_LOCAL_CONFIG = LocalClassConfig(
        component_attr="components",
        init_args_from_option=True,
        structured_component_type=Components
    )


# Base car class
@dynconfig(CarConfigurator)
class Car:
    ...


if __name__ == "__main__":
    ...

    # Create a car
    CarClass = buildclass(Car, args)
    car = CarClass(args.make, args.model)

    car.echo()
The CarConfigurator class includes an attribute declaration for each
mandatory and optional component, specifying mandatory components with
the force_add=True setting. At the bottom, the configurator defines
a series of additional settings (which can be further explored in the
documentation) using DYNDESIGN_LOCAL_CONFIG .
The script works in the same way as the one implemented with the Builder Design Pattern:
$ python car_dynconfig.py -make=Toyota -model=Camry  -Engine=V8  -GPS
Building Toyota Camry with components:
   Engine: V8
   Transmission: Manual
   GPS Navigation
car_builder vs car_dynconfig
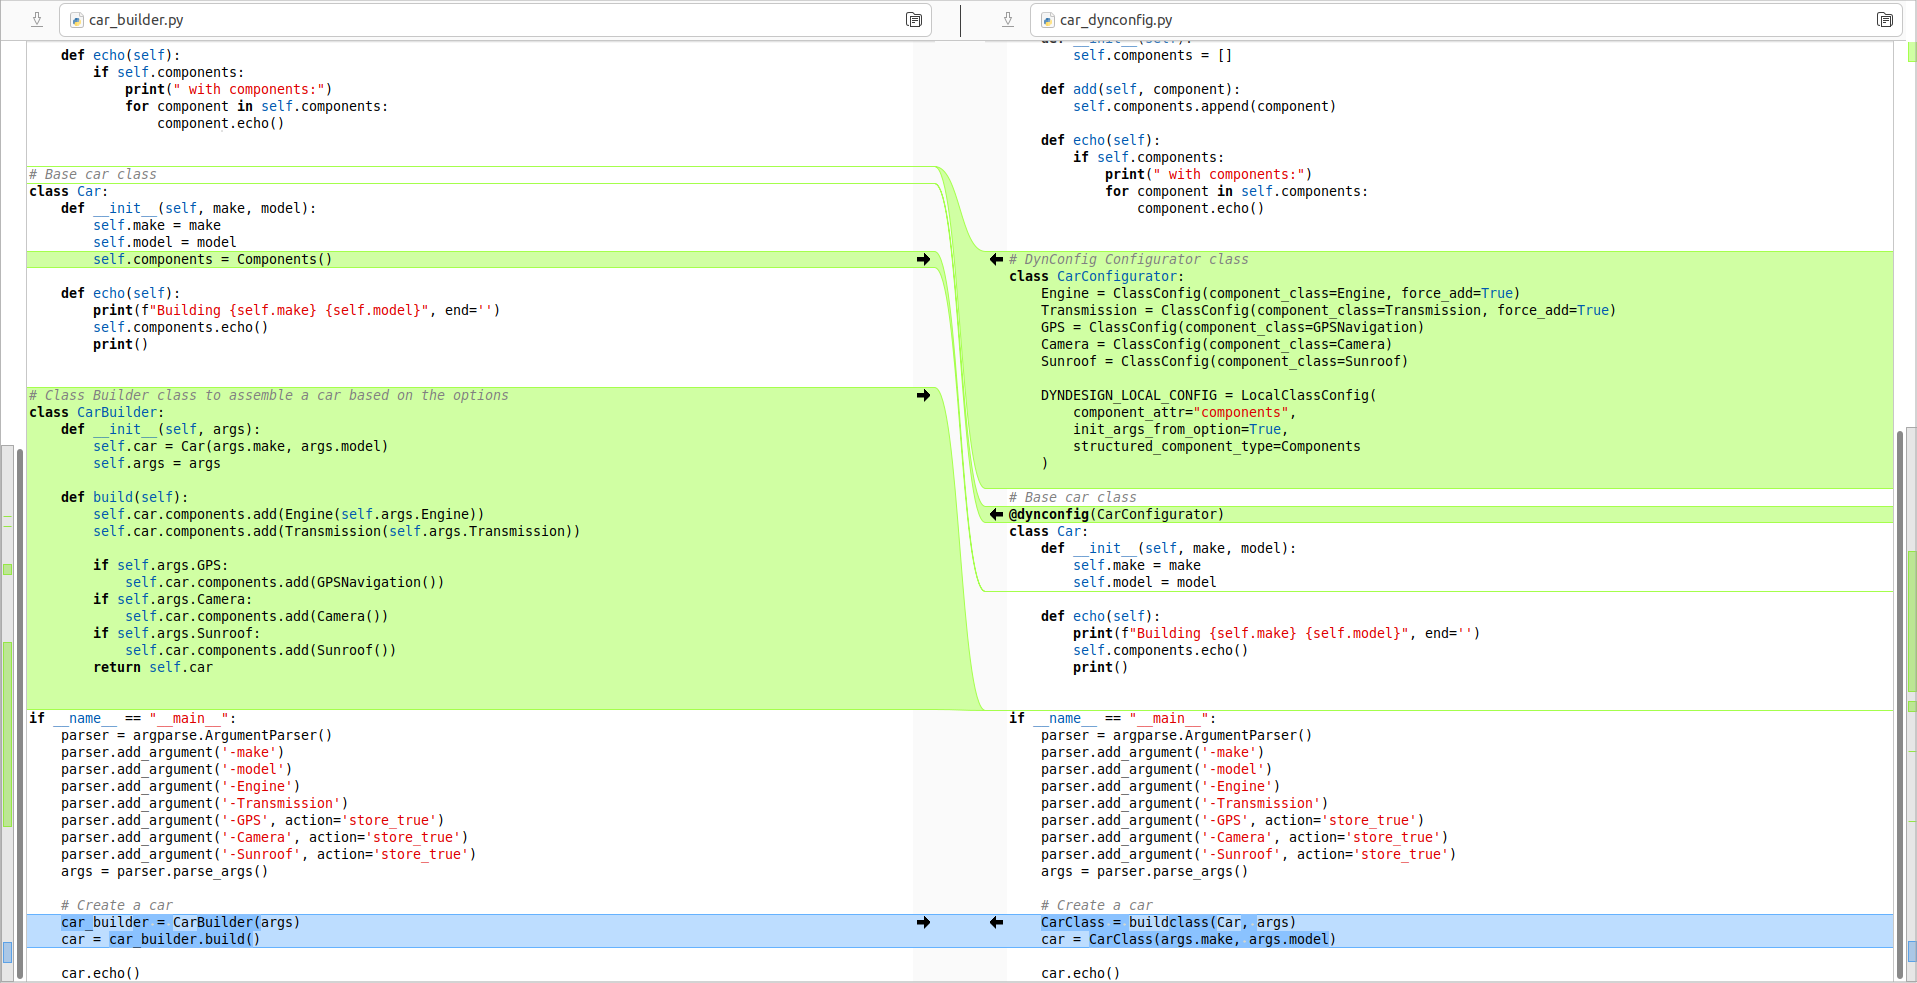
The best way to gauge our progress is a side-by-side comparison between the code of the two scripts.

Examining “car_dynconfig.py” (at the right side) from top to bottom: -
CarConfigurator class is defined and then linked to the Car class via
@dynconfig decorator; - “self.components” initialization is no
longer required in the constructor, as it is performed through the
setting structured_component_type=Components; - CarBuilder class
is no longer required ; - The car object is constructed in two steps:
first, CarClass is configured based on the selected components, then it
is instantiated using the car properties.
Luxury option
Next, we want to add a “-Luxury” option to the scripts. If this option is selected, the car will automatically be equipped with a Sunroof and a Back Camera. Additionally, a “(Luxury Edition)” label will be displayed.
# car_builder_luxury.py

...

# Mixin class for luxury option
class LuxuryMixin:
    def __init__(self):
        self.add_luxury_components()

    def add_luxury_components(self):
        self.components.add(Sunroof())
        self.components.add(Camera())

    def echo(self):
        print("(Luxury Edition)")


# Base car class
class Car:
    ...


# Create a luxury car using the mixin class
class LuxuryCar(Car, LuxuryMixin):
    def __init__(self, make, model):
        super().__init__(make, model)
        super(Car, self).__init__()

    def echo(self):
        super().echo()
        super(Car, self).echo()


# Class Builder class to assemble a car based on the options
class CarBuilder:
    def __init__(self, args):
        CarClass = LuxuryCar if args.Luxury else Car
        self.car = CarClass(args.make, args.model)
        self.args = args

    ...


if __name__ == "__main__":
    ...
    parser.add_argument('-Luxury', action='store_true')
    ...
The Luxury option is implemented through a LuxuryMixin class. If the “-Luxury” option is selected, the car is built based on LuxuryCar (which inherits from LuxuryMixin) instead of on Car.
Below is the output with “-Luxury” set.
$ python car_builder_luxury.py -make=Toyota -model=Camry  -Engine=V8 -Luxury
Building Toyota Camry with components:
 Sunroof
 Backup camera
 Engine: V8
 Transmission: Manual

(Luxury Edition)
If we apply the same upgrade to the “car_dynconfig” script, we can: - Eliminate the constructor and the “add_luxury_components” method from the LuxuryMixin class since the Sunroof and Camera components can be associated with the Luxury option in the configurator. - Bypass the LuxuryCar class implementation and simply define the LuxuryMixin class as a potential parent dependency within the same Luxury option.
# car_dynconfig_luxury.py

from dyndesign import ..., decoratewith

...

# Mixin class for luxury option
class LuxuryMixin:
    def echo_luxury(self, func):
        func(self)
        print("(Luxury Edition)")


# DynConfig Configurator class
class CarConfigurator:
    Luxury = (
        ClassConfig(inherit_from=LuxuryMixin),
        ClassConfig(component_class=Camera),
        ClassConfig(component_class=Sunroof)
    )
    ...


# Base car class
@dynconfig(CarConfigurator)
class Car:
    def __init__(self, make, model):
        self.make = make
        self.model = model

    @decoratewith("echo_luxury")
    def echo(self):
        print(f"Building {self.make} {self.model}", end='')
        self.components.echo()
        print()


if __name__ == "__main__":
    ...
    parser.add_argument('-Luxury', action='store_true')
    ...
The “echo” method in LuxuryMixin class has been converted into the
“echo_luxury” Dynamic Decorator, and it is applied to the Car’s “echo”
method using DynDesign’s decoratewith meta decorator when “-Luxury”
is enabled.
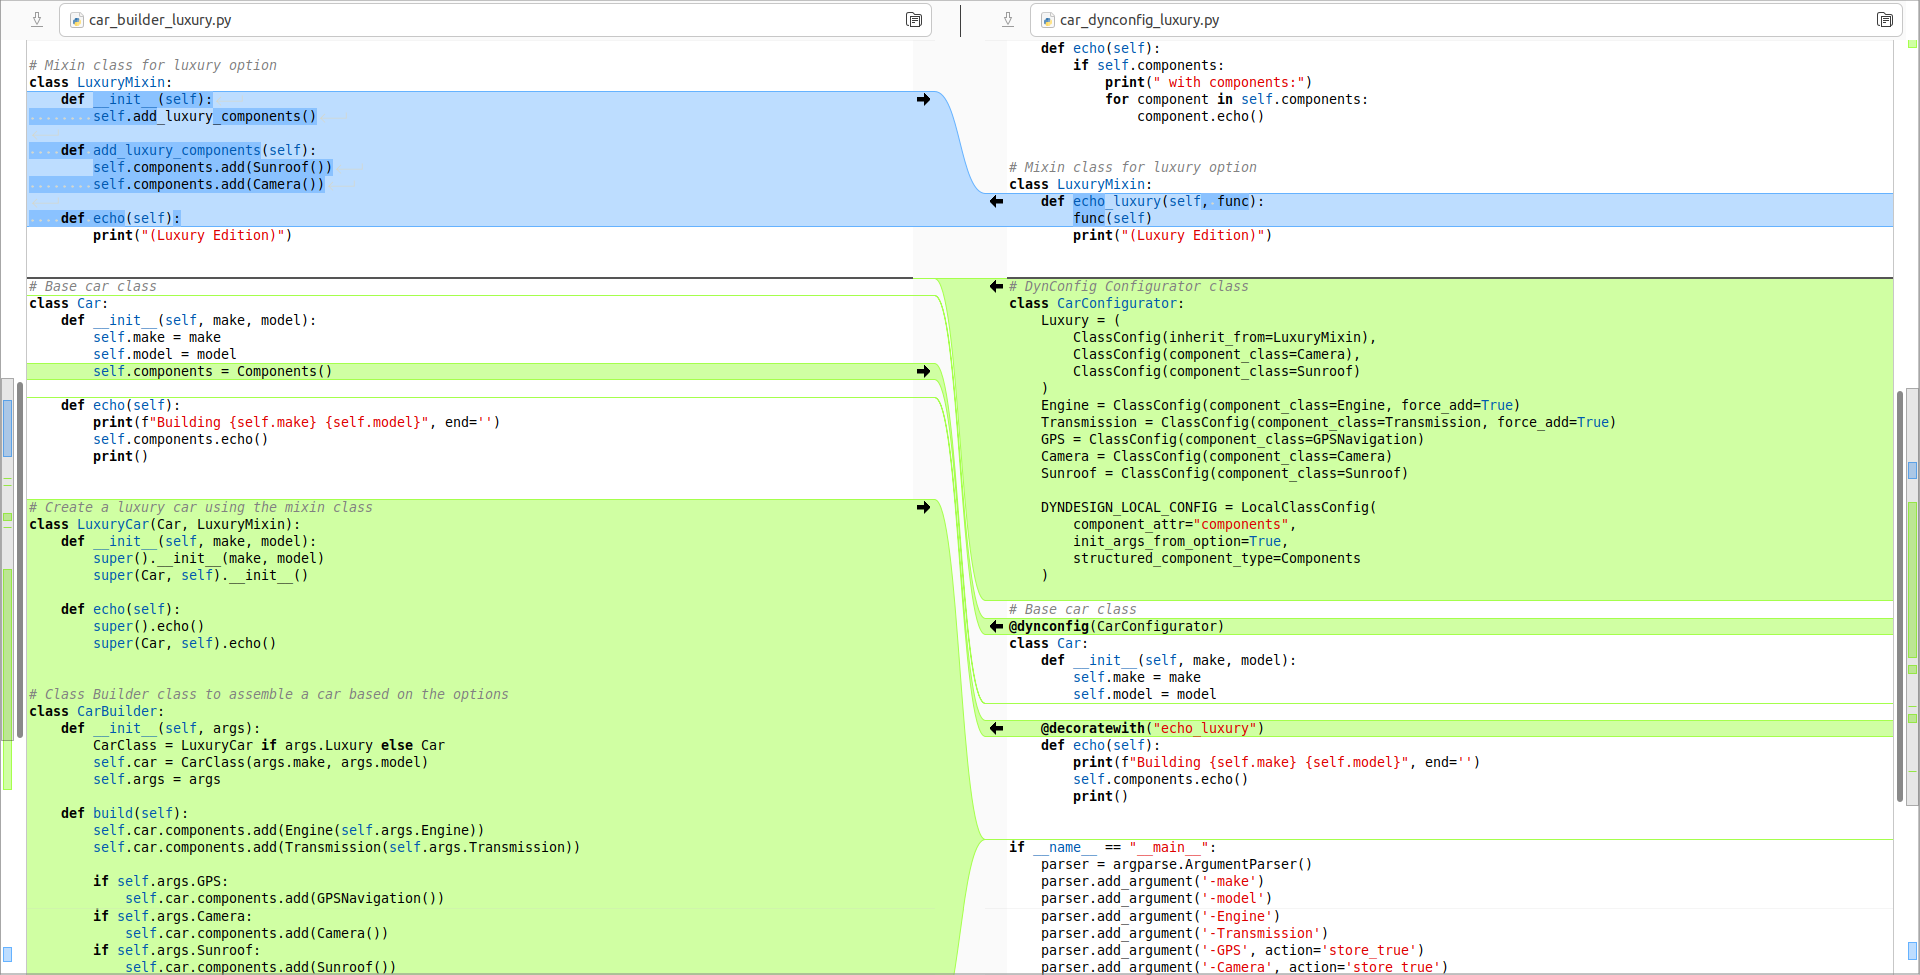
car_builder_luxury vs car_dynconfig_luxury
Here is the side-by-side comparison of the upgraded scripts.

Adding One More Level to the Component Hierarchy
Now, let’s take it a step further. What if we want to build not only the Car but also the Engine and Transmission components? In essence, Transmission and Engine would instantiate sub-component classes based on the selected options.
The following script is an adaptation of “car_builder_luxury” that uses the Builder Pattern to build each mandatory component.
# car_builder_2_levels.py

...

# Sub-component classes
class EngineV6(Engine):
    def __init__(self):
        super().__init__("V6")


class EngineV8(Engine):
    def __init__(self):
        super().__init__("V8")

...

# Class Builders for specific options
class EngineBuilder:
    def __init__(self, engine_type = None):
        self.engine_type = engine_type

    def build(self):
        return EngineV8() if self.engine_type == "V8" else EngineV6()

class TransmissionBuilder:
    def __init__(self, transmission_type = None):
        self.transmission_type = transmission_type

    def build(self):
        return AutomaticTransmission() if self.transmission_type == "Automatic" else ManualTransmission()

...

# Class Builder class to assemble a car based on the options
class CarBuilder:
    ...

    def build(self):
        engine_builder = EngineBuilder(self.args.Engine)
        self.car.components.add(engine_builder.build())

        transmission_builder = TransmissionBuilder(self.args.Transmission)
        self.car.components.add(transmission_builder.build())
  ...
Once again, the flexibility of buildclass comes to our rescue,
helping us maintain a low level of code complexity. Below is the
corresponding modified version of “car_dynconfig_luxury” that does not
require us to implement Class Builders for the components; instead, it
simply changes the type of the corresponding configuration options to a
switch, by specifying all the possible switch options.
# car_dynconfig_2_levels.py

...

# DynConfig Configurator class
class CarConfigurator:
    ...
    Engine = {
        "V6": ClassConfig(component_class=EngineV6),
        "V8": ClassConfig(component_class=EngineV8),
        dynconfig.SWITCH_DEFAULT: ClassConfig(component_class=EngineV6),
    }
    Transmission = {
        "Manual": ClassConfig(component_class=ManualTransmission),
        "Automatic": ClassConfig(component_class=AutomaticTransmission),
        dynconfig.SWITCH_DEFAULT: ClassConfig(component_class=ManualTransmission),
    }
 ...
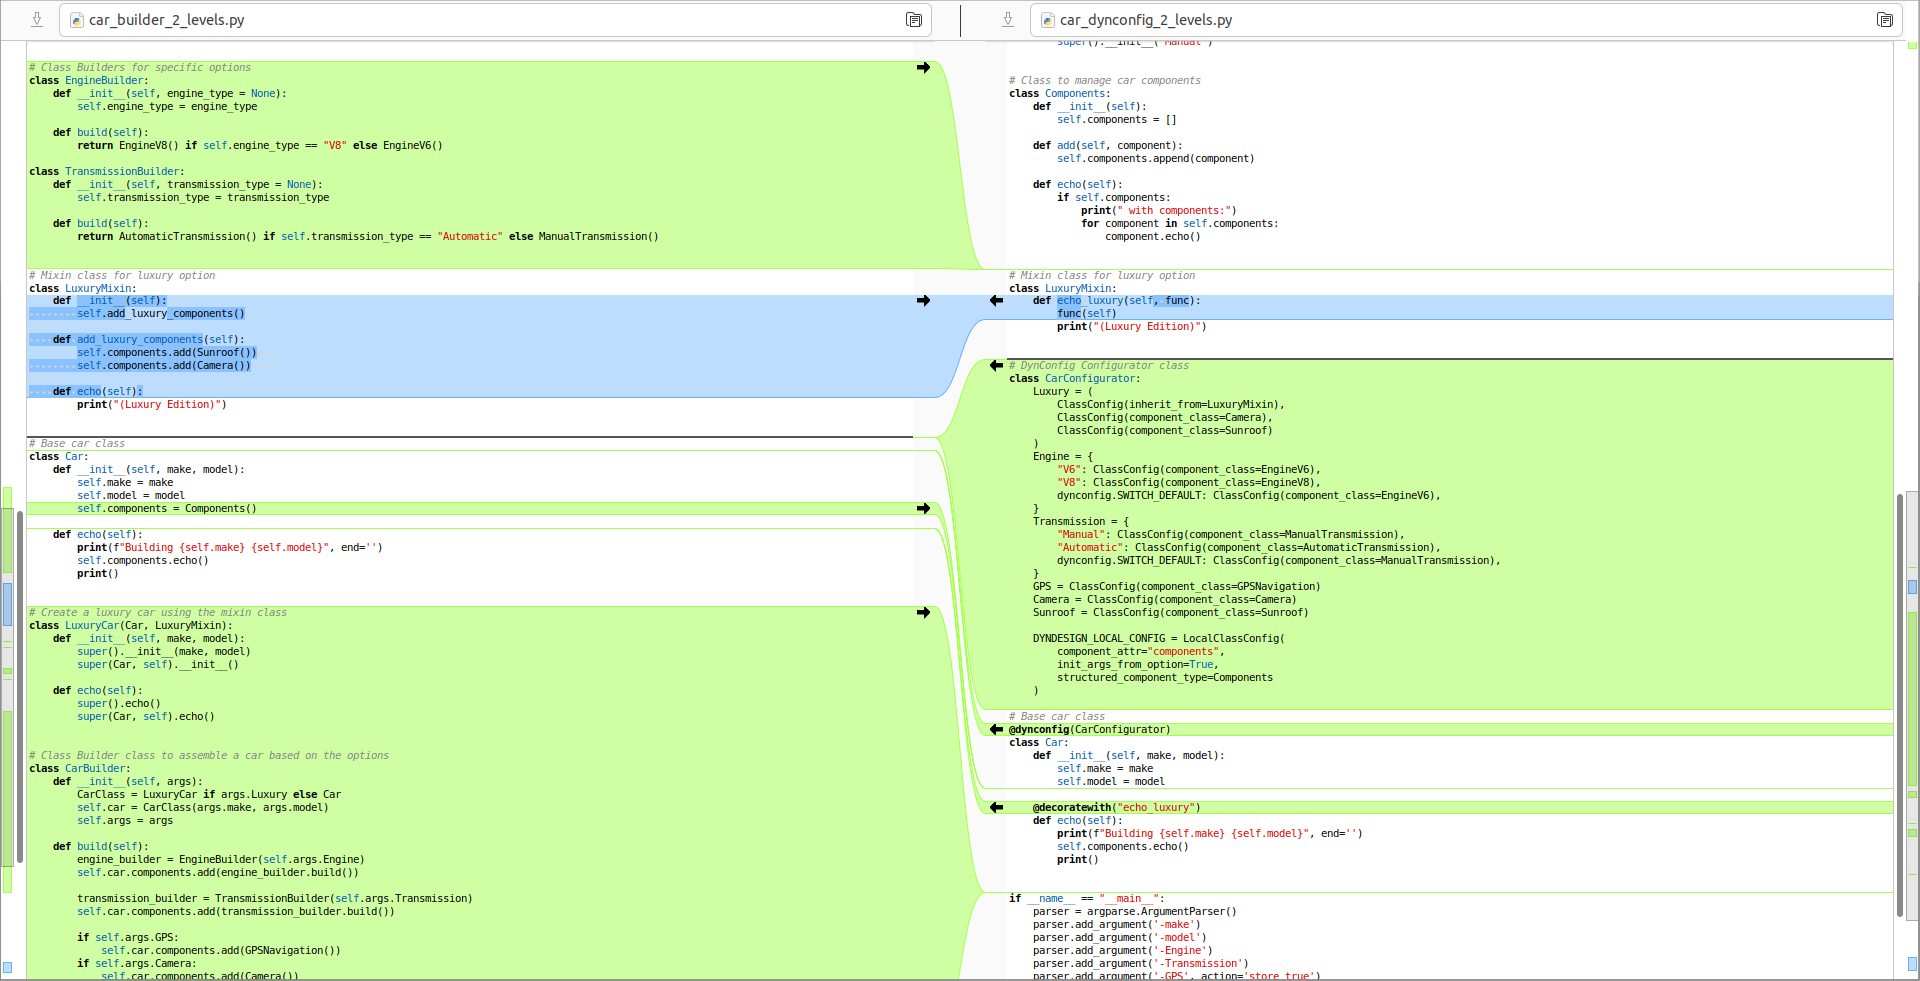
car_builder_2_levels vs car_dynconfig_2_levels

As mentioned earlier, the EngineBuilder and TransmissionBuilder classes
of “car_builder_2_levels” (on the top-left side) are not needed in
“car_dynconfig_2_levels” because buildclass automatically
instantiate the components and then inject them into the Car class based
on the corresponding switch configuration options.
Conclusion
This article directly compares a simplified Builder Design Pattern and
the buildclass function provided by DynDesign. To evaluate their
effectiveness, we selected a script for building a car, ranging from a
basic version to a more advanced one.
Below, we summarize the advantages and disadvantages of ‘buildclass’ compared to other approaches.
Advantages
Maintaining SRP and OCP compliance with code simplicity : The purely declarative approach of
buildclassin class configuration aligns with the SOLID principles while ensuring that the code remains easily comprehensible and maintainable. This benefit becomes even more evident as the complexity of class dependencies (i.e., inheritance and composition) increases.Automating the configuration logic :
buildclasseliminates the need for writing boilerplate code to explicitly implement class configuration.
Disadvantage
Limited support for certain advanced code features in IDEs : Certain advanced IDE features, like source code navigation, may have limitations when using
buildclass. These limitations can be mitigated by adhering to best practices, such as incorporating Type Hinting, as elaborated in the documentation.
Despite the mentioned disadvantage, which can be mitigated through best
practices, buildclass has the potential to significantly save
developers time and streamline the development process.